
The Gravity Forms plugin has advanced features, which give you the ability to create a web form to suit a variety of needs. In this article, you will learn how to create a form that will take selections from certain fields in the form and display a calculated value. An example of this can be seen in this example calculator. Selecting options cause a score to appear at the bottom of the form and a message to give some context for the score.
Step-by-Step
- Step One: Add fields and setup the options
- Step Two: Assign Values to each field
- Step Three: Create the calculation
- Adjust the form’s settings
Step One: Add fields and setup the options
The fire step in creating a calculator is deciding what the options will be for your form and how you want to present them. Three field types can be used for this purpose: Drop Down, Checkboxes, and Radio Buttons fields. The main difference between each field type is how many choices a visitor can select:
- Drop Down field – user can select one option from this field. All options will appear in a list once the field is selected.
- Checkboxes field – user can select one or more options and all options are visible without the need to click on the field.
- Radio Buttons field – user can select a single option from this field and all options are visible without the need to click on the field.
Step Two: Assign Values to each field
Once your fields and choices (options) have been added, it’s time to give each choice a value. For each field you want to include in the calculation:
Select the field and check the box for “Show Values” above the field’s Choices. This will cause a space for Values to appear next to each choice. Add a value for each choice (negative numbers and decimals are supported). Note: it’s helpful to make each value unique due to a bug that causes selected choices not to appear correctly in the notification or form entry if the values are the same. For example, if you have three choices that are valued at 100 each, then make the first choice worth 100.01, the second worth 100.02, and the third worth 100.03.
Step Three: Create the calculation
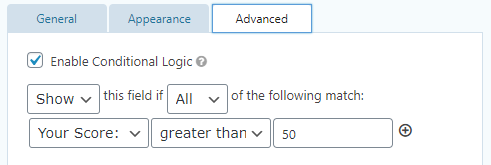
To create the calculation, add a Number field (found under the Standard Fields), and in the General tab select the checkbox for “Enable Calculation”. A “formula” editor will appear below the check box that will allow you to build the calculation for the form. The calculation is built by using “merge tags” for each field (or specific options within each field) and adding them together. A merge tag is Gravity Forms’ way of creating a short piece of code that acts as a unique identifier for a field and each option, so you can point to the information selected or submitted through the field and piece together the information in a customized way. Under the Formula heading you will see a drop down list for each field to add to the calculation box. Select a field, then select the plus sign or type it in next to the merge tag. Note: if you used a checkbox field, you will need to select each option for the checkbox field. More information and images of how to create your calculation. Note: When adding a label for your field, label it to indicate to the person using the calculator what their number means. Read below to learn about how to add specific messages depending on result of the calculation. To do this, add an “HTML” field to the form (found under the Standard Fields) and add the message you’d like to display. In the “Advanced” for this field, select the box for “Enable Conditional Logic”, then add a rule to show the field depending on the score. For example, if you want to show a message based on the score being over a certain amount then you would set it to “Show this field if All the following match:” Read more about conditional logic in Gravity Forms.
Step Four: Adjust the form’s settings
In this final step you will adjusting some form settings to remove the “Submit” button. This is so that your website visitors aren’t submitting their form entries unintentionally. Submission of the information in the form is not necessary and could be a privacy violation, so it’s best to just remove the Submit button all together. The Submit button can be removed through the form’s settings by selecting Settings at the top of the form editing screen. On the form’s settings, look for the “Form Button” heading and check the box for “Button Conditional Logic”. Set the conditional logic to “hide the button if any of the following match:” In the screenshot of the this setting in the Example Calculator, you can see that the rule is set that if the “Your Score:” has a number less than 1000000000000, the button will not appear. That is because this score is impossible given the values assigned to the other field options, so the button will never show. Read more about conditional logic in Gravity Forms.

After you finished setting up the form, and previewed it to ensure it’s working as intended, you can add it to your page using the Gravity Forms block! Please contact Nina Wright with any questions on setting up your form’s calculation or settings.