
Creating Pages
To create a new Page, click on Pages in the Dashboard Navigation Menu on the left side and choose Add New. Note: When the site is created, it has a Sample page. You can delete that.
Enter a Title for the page in the “Enter title here” field. The title of the page is important because it’s also the title of the page’s navigation link in the navigation menu. You want your title to be unique and descriptive, but at the same, time fairly short.
Good Titles
About Us
Patient Forms
Lab Hours
Resources
Poor Titles
EMERGENCY NUMBERS FOR ALL CENTERS
2016 Annual Conference Information and Registration
UFH-CoM Class of 17’
Editing a Page
To edit an existing page, you have two options.
Your first option is through to your Dashboard Navigation Menu, by selecting Pages, and then searching through the list of pages on your site, and clicking on the title of the page you want to edit.
A second option and quicker way to edit a page is through the Admin bar that appears at the top of your web browser. Once you are logged into the WordPress site, navigate through your site as usual and when you land on the page you want to edit, click on Edit Page in the Admin bar. This will open that page in the editor.
![]()
Page Attributes

Pages appear as items in the main site navigation menu with Parent pages at the top with sub-pages below them. The order is alphabetical unless you set a numerical order in the Page Attributes section under “Order”. A larger number in the Order field will move the page to the right in the Navigation bar or further down the sub-page menu.
Parent Menu
The Parent Menu allows you to organize the pages in your site according to a series of Parent, or top-level pages, and sub-pages. The main navigation of the website will use this setting for each page to build out the items in the navigation menu so that Parent pages appear at the top of the menu, and sub-pages appear in the drop down and sub-navigation menus.
Page Template
Important to your ability to use blocks to build your pages in Apollo 2 is selecting the correct page template for your needs.
- Default Template – this is a standard template selected for all newly created pages and is intended for use on internal pages.
- Full Width Template – this template is intended for pages where the maximum width of the screen is absolutely necessary.
- Homepage Template – the Homepage template should be used for pages that will be designated as the homepage for your site. Using this template unlocks the ability to use Section blocks and Hero blocks.
- Members Only – locks the page down behind a valid Gatorlink login.
Pages as Navigation
As each page is created, the menu will expand.
When creating a page, it will automatically become a top-level or parent page, meaning it will appear on the main menu bar. If a page you’ve created or are editing belongs as a 2nd or 3rd level sub-page you can choose the Parent page in the Page Attributes section.
You have a limited amount of space for top-level navigation options, so title your pages as concisely as possible.
Reorganizing the Main Menu
The order in which navigation options appear on the menu is determined by the page order. In the Page Attributes section of the Edit Page screen, you can assign a number to a page to determine its order in the hierarchy. However, this can eventually become confusing as the site grows, as time passes, and new users are adding content. The best tool for this purpose is the Tree View option found under Pages in the Dashboard Navigation Menu.
Using the Tree View feature, you can drag and drop pages into the order you want them to appear on the site and saves each move immediately.
Publishing Pages
The Publish area allows you to: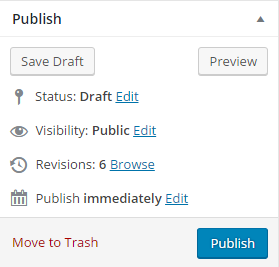
Save Draft – save your page/post in draft form so you can work on its content at different times without it appearing on the live site.
Preview – view your page/post as it would appear on the live site.
Visibility – settings which affect the ability of website visitors to view the page.
Visibility options are:
- Public – All visitors can view the page. This is the default setting.
- Password protected – assign a password of your choosing to the page and only those with the password can view that particular page.
- Private – the page can only be viewed by site WordPress users with specific access to view private pages.
Revisions – view all revisions to the page by each user.
Publish – the page is finalized and viewable by site visitors. However, you can edit this setting to publish your page at a later date. Click on Edit, then choose the date you would like your page to be published. On that date, the system will publish your page automatically.
Move to Trash – delete the page from your site. Pages remain in the Trash and can be restored for 30 days.